In the contemporary work landscape dominated by desk jobs, maintaining good posture has become a crucial aspect of overall well-being. Prolonged hours spent sitting at a desk, often accompanied by poor ergonomics and sedentary habits, can lead to a myriad of posture-related issues. This makes incorporating targeted exercises essential for desk workers looking to mitigate the adverse effects on their posture.
Shoulder Blade Squeeze
The Shoulder Blade Squeeze, also known as Scapular Retraction, is an exercise that targets the muscles between your shoulder blades, helping to improve posture and strengthen the upper back. Here’s a step-by-step guide on how to perform the Shoulder Blade Squeeze:
Instructions:
1. Starting Position: 
- Sit or stand up straight with your shoulders relaxed.
- Keep your spine in a neutral position.
2. Hand Placement:
- Position your arms by your sides.
- Relax your arms and let them hang naturally.
3. Squeeze Your Shoulder Blades:
- Inhale and gently squeeze your shoulder blades together.
- Imagine trying to pinch a pencil between your shoulder blades.
4. Hold the Squeeze:
- Hold the squeezed position for 3-5 seconds.
- Focus on engaging the muscles between your shoulder blades.
5. Release:
- Exhale and slowly release the squeeze.
- Allow your shoulders to return to the starting position.
6. Repeat:
- Perform 2-3 sets of 10-15 repetitions.
- Gradually increase the intensity as you become more comfortable with the exercise.
Tips:
- Maintain Posture: Keep your spine straight and avoid slouching during the exercise.
- Gentle Squeeze: Focus on a controlled and gentle squeeze to avoid straining your muscles.
- Breathing: Inhale before squeezing your shoulder blades and exhale as you release.
- Consistency: Incorporate this exercise into your routine to strengthen the muscles responsible for maintaining good posture.
Variations:
- Seated vs. Standing: You can perform the Shoulder Blade Squeeze while seated or standing, depending on your preference.
- Resistance: To increase the challenge, hold a light resistance band between your hands while performing the squeeze.
- Wall Angels: Perform the exercise against a wall, sliding your arms up and down as you squeeze your shoulder blades.
Benefits:
- Strengthens the muscles between the shoulder blades.
- Improves posture by promoting scapular retraction.
- Helps alleviate tension in the upper back and neck.
Incorporate the Shoulder Blade Squeeze into your regular routine to enhance upper back strength and support overall postural health. If you experience any pain or discomfort, it’s advisable to consult with a healthcare or fitness professional.
Chin Tucks
alleviate tension in the neck and upper back, and strengthen the muscles that support a healthy cervical spine. Here’s a step-by-step guide on how to perform chin tucks:

Instructions:
1. Starting Position:
- Sit or stand up straight with your shoulders relaxed.
- Keep your spine in a neutral position.
2. Neutral Head Position:
- Begin with your head in a neutral position, looking straight ahead.
3. Tuck Your Chin:
- Slowly and gently, draw your chin straight back, creating a double chin or as if you’re trying to make the back of your neck longer.
- Your gaze should remain forward; avoid tilting your head up or down.
4. Hold the Tuck:
- Hold the tucked position for 3-5 seconds.
- Focus on the stretch at the base of your skull and the engagement in the muscles at the front of your neck.
5. Release:
- Relax and slowly release the chin tuck.
- Return your head to the neutral position.
6. Repeat:
- Perform 2-3 sets of 10-15 repetitions.
- Gradually increase the duration of the hold as you become more comfortable with the exercise.
Tips:
- Gentle Movement: Perform the chin tucks with controlled, gentle movements to avoid straining your neck.
- Breathing: Inhale before tucking your chin and exhale as you release.
- Consistency: Include chin tucks as part of your daily routine to reinforce good neck posture.
Variations:
- Seated vs. Standing: You can perform chin tucks while seated or standing, based on your preference.
- Against a Wall: Stand with your back against a wall and perform chin tucks to enhance the stretch.
Benefits:
- Strengthens the muscles at the front of the neck.
- Improves neck posture by encouraging a more neutral position.
- Helps alleviate tension and discomfort in the neck and upper back.
Chin tucks are a convenient exercise that can be incorporated into your daily routine to promote better neck alignment and reduce the impact of prolonged sitting or screen time. As with any exercise, if you experience pain or discomfort, it’s recommended to consult with a healthcare or fitness professional.
Wall Angel
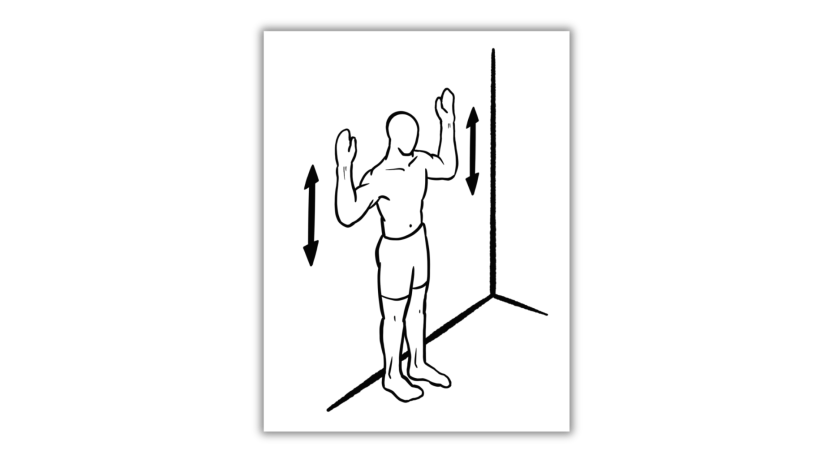
The Wall Angel exercise is a fantastic movement that helps improve posture, enhance shoulder mobility, and strengthen the muscles of the upper back and shoulders. Here’s a step-by-step guide on how to perform Wall Angels:

Instructions:
1. Starting Position:
- Stand with your back against a flat wall.
- Ensure your feet are about hip-width apart, and your lower back is pressed against the wall.
2. Neutral Spine:
- Keep your spine in a neutral position, maintaining contact with the wall from your head to your lower back.
3. Bend Your Elbows:
- Bend your elbows at a 90-degree angle, bringing your arms up so that they are parallel to the ground.
- Your palms should be facing forward, and your elbows should be at shoulder height.
4. Slide Your Arms Up:
- Slowly slide your arms upward along the wall while keeping your elbows and wrists in contact with the wall.
- Aim to reach as high as you can without allowing your lower back to lift off the wall.
5. Return to Starting Position:
- Reverse the movement by sliding your arms back down to the starting position.
- Keep your elbows and wrists in contact with the wall throughout the entire motion.
6. Repeat:
- Perform 2-3 sets of 10-15 repetitions.
- Focus on smooth, controlled movements.
Tips:
- Controlled Movements: Perform the Wall Angels with slow and controlled movements to maximize the engagement of the targeted muscles.
- Maintain Contact: Keep your head, shoulders, elbows, and wrists in contact with the wall throughout the entire exercise.
- Breathing: Inhale as you slide your arms up and exhale as you return to the starting position.
Benefits:
- Improves shoulder mobility.
- Strengthens the muscles of the upper back and shoulders.
- Promotes better posture by engaging the muscles responsible for scapular retraction.
Variations:
- Seated Wall Angels: Perform the exercise while seated on the floor with your back against a wall.
- Resistance: To increase difficulty, use a resistance band looped around your wrists or elbows.
Caution:
If you have any shoulder or back issues, it’s advisable to consult with a healthcare or fitness professional before attempting Wall Angels. Ensure that the movements are pain-free and within a comfortable range of motion.
Chest stretch
The Chest Stretch is an excellent exercise to relieve tightness in the chest and improve flexibility in the front of the shoulders. Here’s a step-by-step guide on how to perform a simple Chest Stretch:

Instructions:
1. Stand Tall or Sit Up Straight:
- Begin by standing tall with your feet shoulder-width apart or sitting up straight on a chair or stability ball.
2. Relax Your Shoulders:
- Allow your shoulders to relax, and keep your spine in a neutral position.
3. Interlace Your Fingers:
- Interlace your fingers behind your back at the level of your lower back.
- If this is challenging, you can use a towel or a yoga strap to bridge the gap between your hands.
4. Open Your Chest:
- Straighten your arms and gently lift them, allowing your chest to open up.
- Focus on squeezing your shoulder blades together.
5. Hold the Stretch:
- Hold the stretched position for 15-30 seconds, feeling a gentle stretch across the front of your chest and shoulders.
6. Release:
- Slowly release the stretch by bringing your arms back down.
7. Repeat:
- Repeat the stretch 2-3 times.
Tips:
- Controlled Breathing: Inhale deeply as you open your chest, and exhale as you release the stretch.
- Gentle Stretch: Avoid forcing the stretch. You should feel a gentle pull, not pain.
- Neutral Spine: Maintain a neutral spine throughout the stretch. Avoid arching your back excessively.
Variations:
- Standing Chest Opener: Stand near a doorway, place your hands on the frame, and gently lean forward to open your chest.
- Corner Chest Stretch: Stand in a corner, place your hands on each wall at shoulder height, and lean into the stretch.
Benefits:
- Improves Posture: Opens up the chest and counteracts the effects of rounded shoulders.
- Alleviates Tightness: Relieves tightness in the chest and front shoulder muscles.
- Enhances Flexibility: Increases flexibility in the shoulder joints.
Caution:
If you have any shoulder or back issues, perform this stretch cautiously, and if you experience pain, discontinue the stretch and consult with a healthcare or fitness professional. Always ensure that the stretch is pain-free and within a comfortable range of motion.
Lumbar Rotation
The Lumbar Rotation Stretch is a gentle exercise that helps improve flexibility in the lower back and promotes mobility in the lumbar spine. Here’s a step-by-step guide on how to perform the Lumbar Rotation Stretch:

Instructions:
1. Starting Position:
- Begin by lying on your back on a comfortable surface, such as a yoga mat.
- Keep your legs extended straight, and your arms resting by your sides.
2. Bend Your Knees:
- Bend your knees, bringing your feet flat on the mat and positioning them hip-width apart.
3. Arms Out to the Sides:
- Extend your arms out to the sides, forming a “T” shape with your body.
- Your palms should be facing down.
4. Engage Your Core:
- Gently engage your core muscles by drawing your navel toward your spine.
5. Lumbar Rotation:
- While keeping your shoulders on the mat, let your knees fall to one side, allowing your lower back to rotate.
- Aim to bring your knees as close to the ground as comfortably possible.
6. Hold the Stretch:
- Hold the stretched position for 15-30 seconds, feeling a gentle stretch in the lower back and across the torso.
7. Return to Center:
- Slowly return your knees to the center, and then repeat the rotation to the opposite side.
8. Repeat:
- Perform the stretch 2-3 times on each side.
Tips:
- Controlled Movements: Perform the lumbar rotation with slow and controlled movements to avoid straining your lower back.
- Breathing: Inhale as you bring your knees to the side, and exhale as you return to the center.
- Neutral Neck: Keep your head and neck in a comfortable, neutral position throughout the stretch.
Benefits:
- Enhances Lumbar Mobility: Promotes flexibility and mobility in the lumbar spine.
- Relieves Lower Back Tension: Alleviates tension and stiffness in the lower back.
- Improves Core Awareness: Engages and strengthens the core muscles.
Caution:
If you have any existing lower back issues, perform this stretch cautiously. If you experience pain or discomfort, discontinue the stretch and consult with a healthcare or fitness professional. Ensure that the stretch is pain-free and within a comfortable range of motion.
Cat-Cow Stretch
The Cat-Cow Stretch, also known as Cat and Camel Pose, is a dynamic yoga stretch that helps improve flexibility and mobility in the spine while promoting core strength. Here’s a step-by-step guide on how to perform the Cat-Cow Stretch:

Instructions:
1. Starting Position:
- Begin on your hands and knees in a tabletop position.
- Ensure your wrists are directly under your shoulders, and your knees are under your hips.
2. Neutral Spine:
- Start with a neutral spine, with your back flat and your gaze looking down between your hands.
3. Cat Pose:
- Inhale as you arch your back toward the ceiling.
- Tuck your chin to your chest, engaging your abdominal muscles.
- Imagine pulling your belly button up towards your spine.
- This is the Cat Pose.
4. Hold the Stretch:
- Hold the Cat Pose for a moment, feeling a stretch in your upper back.
5. Cow Pose:
- Exhale as you move into the Cow Pose.
- Drop your belly towards the mat, lift your head and tailbone towards the ceiling.
- Lift your gaze, opening your chest forward.
- This is the Cow Pose.
6. Hold the Stretch:
- Hold the Cow Pose for a moment, feeling a stretch in your lower back.
7. Flowing Movement:
- Continue to flow between Cat Pose and Cow Pose in a rhythmic motion, coordinating your breath with each movement.
- Inhale for Cat Pose, exhale for Cow Pose.
- Repeat for 10-15 rounds or as feels comfortable.
Tips:
- Smooth Transitions: Move between Cat and Cow Poses in a smooth, flowing motion.
- Breathing: Coordinate your breath with each movement—inhale for Cat Pose, exhale for Cow Pose.
- Pelvic Movement: Focus on the movement of your pelvis, rounding it in Cat Pose and tilting it upward in Cow Pose.
Benefits:
- Spinal Flexibility: Improves flexibility and mobility in the entire spine.
- Core Activation: Engages and strengthens the core muscles.
- Relieves Back Tension: Alleviates tension in the back and neck.
Caution:
If you have any wrist issues or existing spine problems, perform this stretch with caution. If you experience pain or discomfort, discontinue the stretch and consult with a healthcare or fitness professional. Ensure that the movements are pain-free and within a comfortable range of motion.


Real fantastic information can be found on web site.Blog money
Thank you Sophie. That’s very encouraging.